AppsSensorsComputersLightingComponentsSecurityEnergyEntertainmentAppliancesHouseholdTelecomHubsNetworkingSelf-HostedCloudPhonesRadiosPlugsBulbsSwitchesLaptopsMini PCSoCCPUGPUNPUMemoryMotherboardNVMEWiFiFansLocksDoorbellsCamerasAlarmsSensorsMetersPlugsSolarBreakersTVsStreamingSpeakersAudio SystemsSmart KitchenSmart RefrigeratorsSmart DishwashersSmart Coffee MakersSmart OvensWashersDryersWater HeatersRefrigeratorsVacuumsMopsToothbrushesMirrorsScalesHumidifiersButtonsClimatePresenceZigbee HubZ-Wave HubWiFi HubBluetooth HubMatter & Thread HubLoRa HubMulti-Protocol HubSwitchEnclosureCurtainsWiFi APRoutersTablets
Unleash Your Smart Home Potential: Building a Home Local Area Network (LAN) with pfSense and Dedicated Hardware
Published: May 12th 2025 @ 7:57PM
Take Control of Your Network for Peak Performance, Security, and Flexibility
Your smart home is only as reliable and secure as its network foundation. Relying on your ISP's combined modem/router often means compromises, limited control, subpar performance and potential security vulnerabilities. This guide will walk you through building a dedicated Local Area Network (LAN) using pfSense (hosted on a Netgate 1100 pfSense+ Security Gateway), a dedicated switch, and an access point. This approach unlocks significant advantages for the modern smart home: improved speeds, enhanced security, greater flexibility in configuration and the ability to handle a growing number of devices with ease. Imagine mounting your WiFi access point centrally on the ceiling for optimal coverage, effortlessly managing hundreds of IoT devices, or creating custom network segments for specific device types (like isolating guest networks or securing sensitive smart home hubs). A dedicated LAN gives you that power and more.
Understanding Your ISP & Public IP Acquisition
Before diving into hardware and configuration, it is crucial to understand your Internet Service Provider (ISP) and how they handle public IP addresses. This dictates how pfSense will connect to the internet as a WAN interface. Let's break down common connection types:
Key Consideration: Regardless of your ISP, confirm they allow you to use your own equipment. Some providers may restrict this. Also, be aware that some ISPs utilize CGNAT (Carrier-Grade NAT), which can complicate port forwarding and remote access. pfSense can mitigate some CGNAT issues with techniques like VPNs or using a dynamic DNS service.
- Cable/DOCSIS Modem: Most prevalent for many users. You have two options:
- ISP-Provided Modem: Simplest setup initially, but limits control. You will likely need to put your ISP modem into "bridge mode" essentially turning it into a dumb modem that only passes data. This is essential for pfSense to function correctly; otherwise, you will have double NAT (Network Address Translation), causing connectivity issues with many smart home devices and services and preventing you from using port forwarding in pfSense.
- Your Own Modem: Offers full control. You will need a DOCSIS 3.0 or higher modem compatible with your ISP. Check their website for a list of approved modems. This is the recommended approach for maximum flexibility.
- DSL (Digital Subscriber Line): Similar to cable, you can use an ISP-provided modem/router or purchase your own DSL modem. Bridge mode is again critical if using the ISP's device.
- Fiber ISPs: Fiber connections often require a separate Optical Network Terminal (ONT) provided by the ISP. The ONT converts the fiber signal into Ethernet. You will typically need to put the ONT in bridge mode and connect it to pfSense. Some newer fiber services allow you to use your own modem/router, but confirm compatibility with your provider.
- Cellular to Home (e.g., T-Mobile Home Internet): These connections typically come with a preconfigured gateway device. Bridge mode is absolutely essential. If it does not offer bridge mode, consider alternative providers or using a secondary router in bridge mode between the cellular gateway and pfSense.
- Satellite ISP (e.g. Starlink): Starlink's dish provides an Ethernet connection. While you can technically use their provided modem/router, it is generally recommended to put it into bridge mode and connect directly to pfSense for better performance and control. Starlink's dynamic IP addressing requires careful configuration within pfSense (Dynamic DNS).
Key Consideration: Regardless of your ISP, confirm they allow you to use your own equipment. Some providers may restrict this. Also, be aware that some ISPs utilize CGNAT (Carrier-Grade NAT), which can complicate port forwarding and remote access. pfSense can mitigate some CGNAT issues with techniques like VPNs or using a dynamic DNS service.
Choosing Your pfSense Hardware
The heart of your dedicated LAN is the pfSense router/firewall itself. Here are your options:
- Repurposing an Existing PC: A viable budget option if you have an old desktop lying around. Requirements:
- Dual Ethernet ports (one for WAN, one for LAN). If only one port exists, adding a PCI-e ethernet card is necessary.
- Sufficient RAM (at least 1GB or 2GB recommended; 4-8GB or more is ideal for future growth and advanced features).
- A reasonably modern CPU (Intel Core i3/AMD Ryzen 3 or better).
- SSD storage for the operating system and logs (highly recommended over a traditional mechanical spin hard drive).
- Mini PC with Dual LAN: Compact and energy-efficient. Many mini PCs now offer dual Ethernet ports, making them perfect for pfSense. Look for models with Intel Atom/Celeron or AMD Ryzen processors.
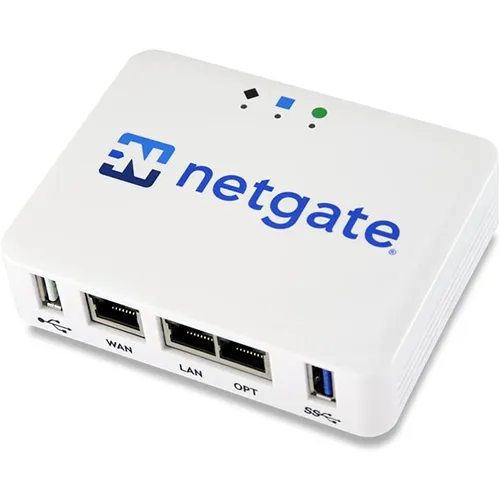
- Netgate Appliances: Netgate is the official vendor of pfSense hardware. They offer a range of pre-built appliances optimized for pfSense performance and reliability.
Featured Hardware: Netgate 1100 pfSense+ Security Gateway
The Netgate 1100 is an excellent entry point into dedicated pfSense hardware. It strikes a balance between price, performance, and features.
- CPU: Underpinned by the powerful, yet energy-efficient, 64-bit Marvell ARMADA® 3720 network processing system-on-chip (SoC), which fully leverages Dual Cortex®-A53 ARM® processor cores.
- Network Ports: Marvell 88E6141 networking switch which drives (3) GbE Ethernet (WAN/LAN/OPT) ports.
- Storage: 8GB eMMC storage.
- Memory: 1GB DDR4 RAM, DDR4 memory allows more stable, higher transfer rates for memory-intensive applications (e.g. IDS/IPS).
- Cooling: The passive cooling system and low power draw of the Netgate 1100 provides efficient thermal management and silent operation expected from smaller devices despite its significantly higher performance.
Featured Product
Netgate 1100 pfSense+ Security Gateway
Where to Buy
Supported Connectivity
wifi
http
localInstalling pfSense
If you purchased an official Netgate device, you can skip this step as it will come preinstalled with the latest pfSense.
- Download the Latest Image: Go to pfSense Download Page and click the Download button. Then choose the appropriate image for your hardware, for the Netgate 1100 choose AARCH64 Memstick ARM) for Intel/AMD CPUs choose: AMD64 Memstick USB. Then proceed through the checkout process, despite it being free this now requires you to create an account and checkout for $0.00.
- Flash the USB Drive: Download and install Balena Etcher here. Open Etcher, select the pfSense image file, select your USB drive, and click "Flash!".
- Boot from USB: Insert the USB drive into your chosen hardware (PC, mini PC, or Netgate appliance). Power it on. You may need to enter the BIOS/UEFI settings to change the boot order to prioritize the USB drive.
Initial pfSense Configuration
- Connect and Access the Web Interface: Connect a computer directly to one of the LAN ports on your pfSense device (not the WAN port). Open a web browser and navigate to http://192.168.1.1 and you should see the pfSense setup wizard.
- Follow the Wizard: The wizard will guide you through basic configuration steps: setting an administrator password, configuring your WAN interface (select "DHCP" if your ISP automatically assigns IP addresses) and configuring your LAN interface.
- Switch Configuration: Once the initial setup is complete, plug your switch into one of the LAN ports on pfSense. Most managed switches will require you to configure them separately via their own web interface. Ensure it is set to operate in "access mode" or "unmanaged mode."
Power over Ethernet (PoE) and Network Switch Considerations
Many modern access points and even some smart home devices (e.g. IP Cameras) support Power over Ethernet (PoE). This allows you to power them directly through the network cable, eliminating the need for separate power adapters. A PoE capable switch simplifies deployment by providing both power and data connectivity. When selecting a switch, consider:
- Number of Ports: Enough ports for all your devices.
- PoE Support: Total wattage available to support your PoE devices.
- Managed vs. Unmanaged: Managed switches offer advanced features like VLANs (Virtual LANs) and Quality of Service (QoS), which can be useful for isolating IoT networks and prioritizing traffic in a smart home environment.
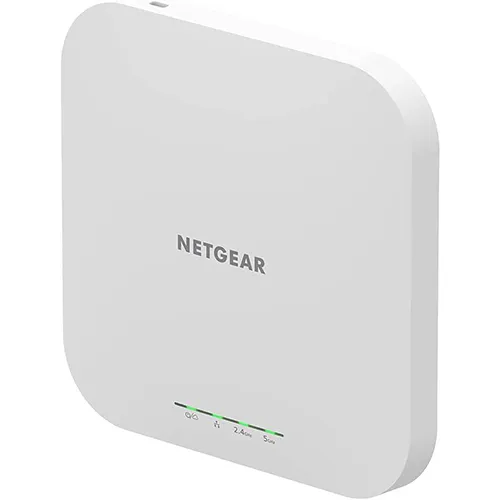
Setting Up Your Wi-Fi Access Point
- Choose an AP: Ubiquiti UniFi, Cisco and Netgear are popular choices known for their performance, reliability, and centralized management capabilities.
- Connect to the Switch: Plug your access point into a PoE port on your switch (if supported). If not, also use a separate power adapter.
- Configuration: Access the AP's web interface (usually by connecting a computer directly to the AP, or if it supports DHCP navigating to the AP's local IP address in a browser) and configure it with your desired SSID (network name), password, and security protocol (WPA2/WPA3 is recommended).
- Mesh Networking: Consider using mesh networking capabilities offered by Ubiquiti, Cisco or Netgear for extending Wi-Fi coverage throughout your home. Mesh networks allow multiple access points to work together seamlessly, providing a consistent connection as you move around.
Note: This guide provides a general overview. Specific configuration details may vary depending on your hardware and ISP. Always consult the documentation for your devices and pfSense itself for more detailed instructions.
Further Reading: See our guide on the importance of a solid WiFi Access Point and why it is the backbone of the modern smart home.